Level 2: Articulation and the Wrist
An essential concept of Level 2 is beginning articulation, specifically legato and staccato. These terms are so familiar to us as music teachers that we might overlook the importance of these touches in developing technique and musical expression.
Perhaps you have noticed that there are no articulation marks at Level 1—no slurs and no staccato marks. We delay teaching legato to ensure that a modicum of finger independence develops before insisting on connected touch. When a student’s finger and small muscle coordination is undeveloped (common, and not a cause for concern), an insistence on legato playing can cause tension in the hand. This happens when pressure is maintained against the keybed. In most cases, the playing of a key should be followed by immediate relaxation, maintaining only sufficient balance of the hand and arm to keep the key depressed.
We commonly hear young primer-level students play all notes detached, poking at each key with a pump of the wrist or a stab with the elbow. While we want to minimize (but not necessarily eliminate) the wrist pumping, this non-legato touch inserts a relaxation between each note, which can be beneficial. The student is naturally building coordination by practicing a relaxation response after each finger plays. Granted, it doesn’t sound good to a musician’s ear, but it does seem to improve coordination (and rhythm as well).
Wrist Gesture
What does it mean to play legato? Yes, it is a connected touch, but—more importantly—it is the playing of several notes in a single gesture. It is initiating a phrase with a drop of arm weight and passing (transferring or “rippling”) that weight from finger to finger.
In Piano Adventures®, the component parts of the legato touch are isolated and sequenced over several levels in the Technique and Artistry books, so that each element can become an automatic skill. This spiral approach offers both review of a previously learned skill and expansion of the technical concept, polishing the gesture and practicing its applications over advancing levels.
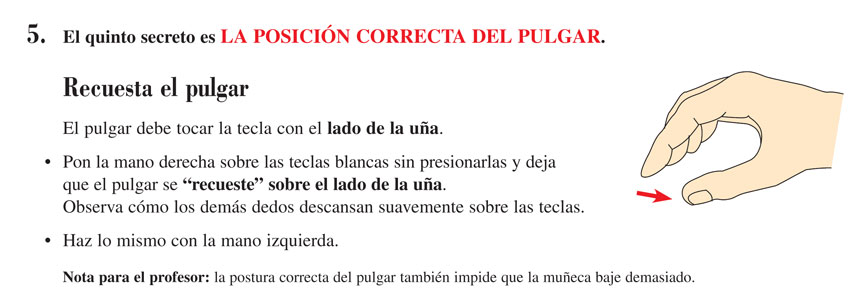
• Height of the wrist This is established at Level 1 with the Technique Secret called “Thumb Perch.” Playing on the side tip of the thumb (instead of a horizontal thumb) eliminates a sagging wrist, which is so common at this level.
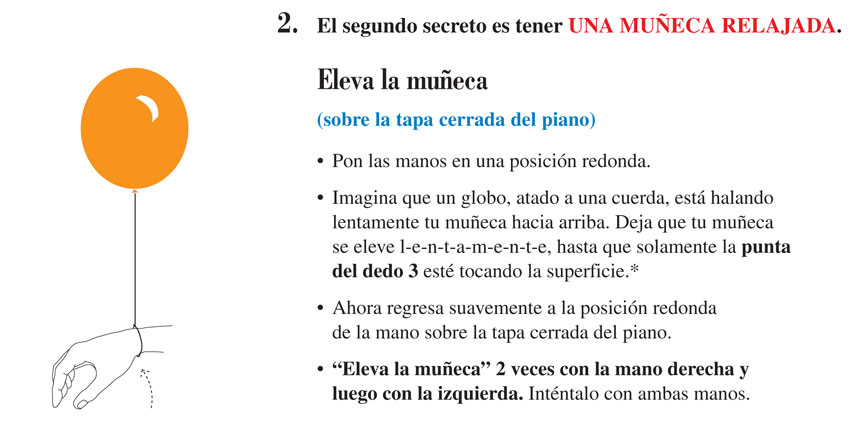
• Range of wrist motion “Relaxed Wrist,” the Level 2 Technique Secret No. 2, establishes the range of motion for the wrist in the exercise “Wrist Float-off.” With hands on the closed keyboard lid, an imaginary balloon pulls the wrist upward until only the tip of finger 3 is in contact. This precludes a locked wrist and models the gesture for a phrase ending.
• The wrist gesture At Level 3 (Technique Secret No. 5), the exercise “Making Rainbows” applies the Wrist Float-off to playing keys across the keyboard.
• The slur gesture The drop and release of arm weight through several notes is specifically practiced at Level 4 with the Technique exercise called “Small Wrist Lift.” Here the student perfects the “down-and-up” motion of the slur gesture.
• The tapered ending At Level 5, the focus is on “rounding off” the phrase ending. The wrist gesture carries the weight off the key to soften the last note of the slur.
Legato and the Wrist
So what do we expect of the student at Level 2? We want a flexible, relaxed wrist that freely moves up within an established range of motion. We don’t focus on down motions of the wrist here, as these tend to collapse the fingertip and lock the wrist low. We do focus on the up motion. It is the flip side of the arm-weight drop. The student drops into the phrase with arm weight and releases the weight with the Wrist Float-off. This needn’t be complex. We simply encourage the student to apply the wrist float-off at certain points in the music.
There are countless applications when we look beyond just phrase endings. The Wrist Float-off is tremendously valuable for preparation. The rising wrist can carry the hand to its new placement in crossovers, octave leaps, and position changes. It also lends grace to closing chords. And, long-held notes come alive by replacing a static hand with a wrist that slowly rises through the duration of the note.
Staccato and the Wrist
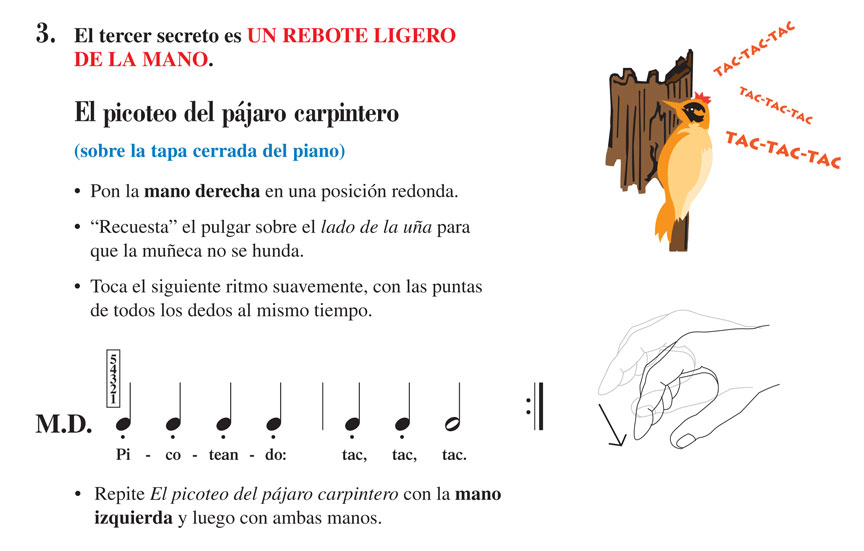
There is no single way to play staccato. Staccato playing is always contextual—that is, the execution of the staccato depends on the musical context. For this early level we choose the wrist staccato (Secret No. 3, “Light Hand Bounce”), a technique that essentially dribbles the hand from a slightly elevated wrist. Notice how well this complements the Level 1 theme of relaxing the wrist and finding its appropriate range of motion. With the exercise Woodpecker Taps, this staccato technique applies fittingly to the repeated notes and repeated intervals that characterize much of the repertoire at this level. This gentle hand bounce not only relaxes the wrist, but also provides a technique for playing soft, accompanying chords.
This has big payoff at Unit 8 where chords are first introduced. Instead of loud, clunky chords that overwhelm the melody, the left hand effectively plays soft, staccato chords in the first pieces with block chord accompaniment. This is possible because of the technique acquired early in the level (and the compositional placement of the accompanying chords on beats where the melody is sustained, not played).
Summary
In summary, the Wrist Float-off and the Light Hand Bounce constitute essential wrist gestures that derive from their counterparts—legato and staccato. These gestures provide a technical foundation on which more refined technique can be developed. And, importantly, whether through shaping a phrase, softening an accompaniment, or adding elegance to an ending, these gestures add a great degree of musical artistry … which is especially appreciated at this early level.
